Saturday, December 14, 2013

Foil Lid Christmas Angels


Christmas is truly that time of year for crafters to get into creative mode and turn virtually anything into an ornament or a seasonal statement. Here are some tips to turn that aluminum foil lids from your children's formula into whimsical Christmas angel decors using only a pair of scissors.

(1) The pull~up ring is the reference point and will serve as the head. (2) Cut small slots on both sides of the aluminum one~third of the way from the ring. (3) Turn the whole thing into a cone, pinch the lower part of the ring a bit and (4) cut an inverted v-shape at the back of the angel.

 (5) Lay open and flatten out the cut portion. (6) Interlock the slots at the front. (7) Using the half part of another foil lid, cut the shape of the wings. (8) Fold at the center and cut an upright v-shape.
(9) Attach the wings to the back of the angel by interlocking the v-cuts on both. (10) Now the general basic shape of the angel is completed and you can proceed to embellishing and decorating it to your taste. (11) Aluminum foil can be embossed over any intricately designed finding like a perfume cap (12) or you can hand emboss it by using any sharply~pointed object.

You can decorate your angels further with other materials like craft beads or glitters and you can either hang them up on your tree or prop them on dainty bottles.


Tuesday, December 10, 2013

No Sew, No Glue, Fabric Pouch ( and it's not Furoshiki)

A no sew and no glue fabric (and tulle) pouch.
This project would work best on fabrics that won't fray much when cut. Although, any woven fabric will fray at least a little especially after washing, there are those that fray less than others. It would help to observe how the knit of the fabrics behave when inside a fabric store. Cutting the edge with pinking shears would also reduce fraying.


Materials:

  1. fabric (I used flannel)
  2. tulle (this is optional)
  3. lace or string
  4. pair of scissors
  5. a ticket puncher
(1)Fold a triangle on your fabric and (2) cut. (3) Make another triangle fold to (4) prepare for cutting.

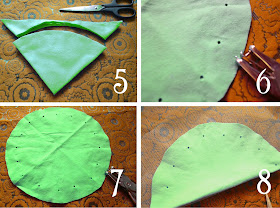
 (5) Cut a quarter of a circle. (6) Take your ticket puncher and start working on your holes. (7) The holes should be evenly-spaced and even-numbered. (8) Take your tulle and prepare to cut.
 (9) The tulle should be cut a little larger than the first fabric. (10)Fold it several times and (11) cut a round edge to make pretty ruffles. (12) Prepare to slide the lace or string through the holes.
 (13) Lay the two fabrics in place and start working on the lace. (14) Cut the lace several centimeters from the last hole. (15) Tie ends together and begin sliding the second lace at the opposite hole of where the first string came in. (16) Tie the ends of the second lace. Voila, pull the strings and your pouch is ready to go.
A little gift bag in time for the holiday.


Friday, December 6, 2013

Ninjago Birthday Banner

Make your own D-I-Y Ninjago Birthday Banner

1~ Print this free pattern at the back of an 8" x 11" colored paper. The flap at the head is for the string. You can paste the edge of the flap at the back or simply staple.
Open image in new tab and save.
2 ~ Cut, then fold the flaps.

3 ~ Print this free Happy Birthday letters on an 8" x 11" copy paper.

Open image in new tab and save.


4 ~ Cut and paste on the Ninjago silhouettes.
5 ~ String and hang.