Saturday, December 14, 2013

Foil Lid Christmas Angels


Christmas is truly that time of year for crafters to get into creative mode and turn virtually anything into an ornament or a seasonal statement. Here are some tips to turn that aluminum foil lids from your children's formula into whimsical Christmas angel decors using only a pair of scissors.

(1) The pull~up ring is the reference point and will serve as the head. (2) Cut small slots on both sides of the aluminum one~third of the way from the ring. (3) Turn the whole thing into a cone, pinch the lower part of the ring a bit and (4) cut an inverted v-shape at the back of the angel.

 (5) Lay open and flatten out the cut portion. (6) Interlock the slots at the front. (7) Using the half part of another foil lid, cut the shape of the wings. (8) Fold at the center and cut an upright v-shape.
(9) Attach the wings to the back of the angel by interlocking the v-cuts on both. (10) Now the general basic shape of the angel is completed and you can proceed to embellishing and decorating it to your taste. (11) Aluminum foil can be embossed over any intricately designed finding like a perfume cap (12) or you can hand emboss it by using any sharply~pointed object.

You can decorate your angels further with other materials like craft beads or glitters and you can either hang them up on your tree or prop them on dainty bottles.


Tuesday, December 10, 2013

No Sew, No Glue, Fabric Pouch ( and it's not Furoshiki)

A no sew and no glue fabric (and tulle) pouch.
This project would work best on fabrics that won't fray much when cut. Although, any woven fabric will fray at least a little especially after washing, there are those that fray less than others. It would help to observe how the knit of the fabrics behave when inside a fabric store. Cutting the edge with pinking shears would also reduce fraying.


Materials:

  1. fabric (I used flannel)
  2. tulle (this is optional)
  3. lace or string
  4. pair of scissors
  5. a ticket puncher
(1)Fold a triangle on your fabric and (2) cut. (3) Make another triangle fold to (4) prepare for cutting.

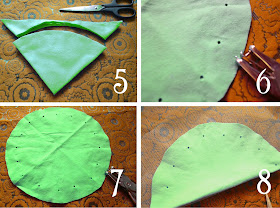
 (5) Cut a quarter of a circle. (6) Take your ticket puncher and start working on your holes. (7) The holes should be evenly-spaced and even-numbered. (8) Take your tulle and prepare to cut.
 (9) The tulle should be cut a little larger than the first fabric. (10)Fold it several times and (11) cut a round edge to make pretty ruffles. (12) Prepare to slide the lace or string through the holes.
 (13) Lay the two fabrics in place and start working on the lace. (14) Cut the lace several centimeters from the last hole. (15) Tie ends together and begin sliding the second lace at the opposite hole of where the first string came in. (16) Tie the ends of the second lace. Voila, pull the strings and your pouch is ready to go.
A little gift bag in time for the holiday.


Friday, December 6, 2013

Ninjago Birthday Banner

Make your own D-I-Y Ninjago Birthday Banner

1~ Print this free pattern at the back of an 8" x 11" colored paper. The flap at the head is for the string. You can paste the edge of the flap at the back or simply staple.
Open image in new tab and save.
2 ~ Cut, then fold the flaps.

3 ~ Print this free Happy Birthday letters on an 8" x 11" copy paper.

Open image in new tab and save.


4 ~ Cut and paste on the Ninjago silhouettes.
5 ~ String and hang.


Friday, November 29, 2013

Ninjago Birthday Give-away Kit

Just recently, my elder son celebrated his 7th birthday. It was themed after his favorite Ninjago characters. I was able to come up with this semi-cloth-wrapped give-away kit with a ninja-ish ballpen-sword as accent.

The cloth part of the package, supposed to be evocative of the traditional Japanese wrapping called Furoshiki was designed to later double as ninja headband; it was an instant hit among his classmates...

...but the best part is, my son thought I was clever.

Ninjago Birthday Give-away Kit


I got lucky to have found this novelty item from a local store, not exactly the Ninjago weapon but did the job fairly well.
Wrapping the cloth is very simple but the idea is to make it really neat.

And they come in other Ninjago colors too.


Thursday, November 28, 2013

Bead and Wire Mini-Christmas-Parol


For my part of the world, with no snowflakes or chilly winter, it is usually the warm-colored lights of the parol that ushers in the Christmas spirit as early as September.


A parol is a Christmas lantern ornament unique to the Philippines, it is dominated by a basic five-point star pattern and is usually lighted with bright mini-lights. In most cases, it is made up of bamboo sticks and Japanese paper or colored cellophanes. But nowadays, materials vary, along with the tweaks in the design.

 Essentially, the parol evokes the Star of Bethlehem that guided the path for the Magi to find and witness the birth of the Messiah. To Filipinos it is also a symbol of hope and radiance through the darkness.

How to Make a Bead and Wire Mini-Christmas-Parol

Materials to be used are: wire tools for cutting and twisting; assorted beads of your choice; and craft wire.


  1. Take an approximately 3" wire, put a bead in the middle whilst bending the wire slightly; this bead will be part of the star at the center of the parol.
  2. String two more beads through both ends of the wire.
  3. Twist the wire once or twice to steady the three beads.
  4. Push another bead, joining the bended wire as one.
  5. Add two or more beads, playing on the colors.
  6. Make four more sets of this to complete the parts of the five-pointed star.
  7. Take another piece of wire and string the five initial beads together to form the star at the center of the parol.
  8. Twist that wire at the back and cut excess.
  9. Add more elements like the outer circle and 'tails' depending on your design preference.

Wednesday, November 13, 2013

Creativity Quote of the Week and a Plea

This post is dedicated to the victims/survivors of  Super Typhoon Haiyan...


photo: "failure is not final..."
"Creativity is a shout of hope." ~ pixellbee

A personal note to my readers...

Growing up in a developing country where most I see from people's everyday life is a struggle to make both ends meet, creativity to me has grown to have a deep personal meaning. The desire to create something akin to a glimpse of paradise is to me an expression of hope for better things, for myself and for those close to me, a renouncement and a way out of mediocrity. When a person translates this hope to something that he then can hold in his hands, that is faith. When the mother of Moses made a basket to save her baby, that is faith and hope at work, that is creativity and God honored it.

Following the recent calamity that has befallen my nation, it took me a while to collect myself and return to this blog. In my projects I have purposely avoided using styrofoams as my little way of contributing to the welfare of our environment. On this note I would like  to feature an excerpt from the speech of Yeb Sano, lead negotiator for the Philippines at the opening of United Nations Climate Talk in Warsaw Poland held last November 11 as he linked the massive devastation of Super Typhoon Haiyan to climate change:


"I speak for my delegation. But more than that, I speak for the countless people who will no longer be able to speak for themselves after perishing from the storm. I also speak for those who have been orphaned by this tragedy. I also speak for the people now racing against time to save survivors and alleviate the suffering of the people affected by the disaster.

We can take drastic action now to ensure that we prevent a future where super typhoons are a way of life. Because we refuse, as a nation, to accept a future where super typhoons like Haiyan become a fact of life. We refuse to accept that running away from storms, evacuating our families, suffering the devastation and misery, having to count our dead, become a way of life. We simply refuse to.

We must stop calling events like these as natural disasters. It is not natural when people continue to struggle to eradicate poverty and pursue development and gets battered by the onslaught of a monster storm now considered as the strongest storm ever to hit land. It is not natural when science already tells us that global warming will induce more intense storms. It is not natural when the human species has already profoundly changed the climate.

Disasters are never natural. They are the intersection of factors other than physical. They are the accumulation of the constant breach of economic, social, and environmental thresholds. Most of the time disasters is a result of inequity and the poorest people of the world are at greatest risk because of their vulnerability and decades of maldevelopment, which I must assert is connected to the kind of pursuit of economic growth that dominates the world; the same kind of pursuit of so-called economic growth and unsustainable consumption that has altered the climate system."


- See more at: http://www.rtcc.org/2013/11/11/its-time-to-stop-this-madness-philippines-plea-at-un-climate-talks/#sthash.euTNfj99.dpuf


Thursday, October 31, 2013

Moon Lantern

These moon lantern making tips can come in handy not only for festival purposes but for decorating stage sets for children's school play or for adding a special accent in your baby's room.

First Step: 

Second Step:

Third Step:
This hole can be modified later by adding a flap to the side of the cut portion to tuck inside the lantern.

Hang up or attach to a pole.


Wednesday, October 30, 2013

Creativity Quote ~ Rumi

“Don't be satisfied with stories, how things have gone with others. Unfold your own myth.” ~Rumi


Thursday, October 24, 2013

Scraft-o-Toy: Paper Cup Queen

A little something to amuse oneself after a cup of  sweet treat...
The Paper Cup Queen


Things needed...


Procedure...


Tuesday, October 15, 2013

Creativity Quote ~ Ursula K. Le Guin

“The creative adult is the child who has survived.”~ Ursula K. Le Guin


Thursday, October 10, 2013

No-Sew, No Glue, Crafty Booklet Binding


Make a home for your loose doodles~ try this crafty no glue, no stitch booklet binding technique.

(1) Gather up colored art or construction papers, (2) fold them together in half; (3) make an approximately 1/2 inch fold at the side; (4) make little cuts to the fold at the side with equal distances; (5) alternately fold the cuts on the side.

An early attempt at creative writing by my boy aged six. Please excuse the grammar and spelling, English isn't our mother tongue.


Thursday, October 3, 2013

Mini Ice Cream Parlor Set


Dollhouse furniture-making can be a very engaging hobby. It dates back to centuries past when rich housewives (and everyone else) didn't have thrilling TV series to consume their time with. It can also be a great bonding activity for mother-daughter tandems~ so it would be wise to save some tricks up your sleeves from time to time.

Two major things this project needs is a trio of champagne cork cages and a rope. But if you have an old, outdated and worn braided rope belt you are ready to discard away with any minute- well hold on a second...always think recycling, it is kind to our environment.


You'll Need:
  • 3 or more cork cages
  • rope or an old braided rope belt
  • a bottle cap
  • some wires
  • strong undiluted white glue
  • a piece of cardboard
  • a pair of scissors
  • some wire tools
  • a glue gun/ glue stick
  • a black marker

Procedure:

  ~for the chair
  1. First take out the cap and the separate bottom wire off the champagne cork cage.
  2. Cut 2 pieces of extra wire with lengths of about 6" each.
  3. Bend to form 2 mirror image of the pieces that would resemble the back support of an ice cream parlor chair.
  4. Attach the two wires together by twisting, now they are one piece.
  5. Attach this to the cork cage.
  6. This is optional: replace a new wire at the bottom part of the cork cage; most ice cream parlor chairs have this part. 
  7. For a slick finish, cover the completed chair frame with a 'coat' of black marker.


 ~for the table
  1. Take out the cap and the separate bottom wire off another champagne cork cage.
  2. To elevate the table, hot glue a bottle cap on top of the cork cage.
  3. Cut 2 small and 1 large proportionate circles on a piece of cardboard.
  4. Coil the end of rope by itself in a small circle then start glue-ing at the center of a cardboard piece winding round and round till it's fully covered.
  5. Secure the other end of the rope at the back of the cardboard.
    This is how the set would look after the 'seats' and the table board have been attached:


Tuesday, October 1, 2013

Creativity Quote ~ Albert Einstein

faux tree on a faux moon

“Logic will get you from A to B. Imagination will take you everywhere.”

                                                                               ~Albert Einstein

Saturday, September 28, 2013

Dress Up Bottles: Plants vs. Zombies


If you ever think Plants-vs-Zombies characters are cute (except the zombies anyway) and you're planning a themed party based off it, well here's a tip on creating decorations that are not that complicated and overly time-consuming: simply dress up some empty bottles to play the part.


Things you'll need:
  • crepe papers of the right colors
  • cartolinas or construction papers of the right colors
  • clear tape/double-sided tape
  • pair of scissors
  • craft knife
  • plastic jar lids of the approximately right sizes 
  • wooden sticks or used toothbrushes (you may pull out bristles first: dip in hot water then remove manually with a pair of pliers.)
  • old newspapers
  • clean empty bottles
  • plastic bottle (choose one that is shaped somewhat like peashooter)
  • black marker 


SUNFLOWER

To make Sunflower
  1. Attach stick or old toothbrush on top of a bigger-than-mason-jar lid. An 800 ml ice cream tub lid is about the right size.
  2. Fill the hollow part of the lid with newspaper or used brown bag.
  3. Cover the 'face' part with two to three layers of orange crepe paper.
  4. Cover the bottle stand with green crepe paper.
  5. Put petals and face parts using cartolinas or construction papers.
  6. Put paper leaves at the bottom part of the bottle. If the paper you're using for this is not sturdy enough, attach a folded strip of  paper at the other side of each leaf, make it bend a little.

MARIGOLD


To make Marigold
  1. Attach stick or old toothbrush on top of this time~ a mason jar lid. 
  2. Fill the hollow part of the lid with newspaper or used brown bag.
  3. Cover 'face' part with two to three layers of yellow crepe paper.
  4. Cover the bottle stand with green crepe paper.
  5. Put petals and face parts using cartolinas or construction papers.
  6. Put paper leaves at the bottom part of the bottle. 

PEASHOOTER

To make Peashooter
  1. Cut the appointed plastic bottle that will assume the head of peashooter at the right size. 
  2. Cut a hole that will fit the mouth of the glass bottle that will serve as its stand.
  3. Customize the shape by adding layers of newspaper pieces where they'd be needed.
  4. Cover with green crepe paper.
  5. Put face parts using cartolina or construction paper.
  6. Cover the bottle stand with green crepe paper
  7. Put paper leaves at the bottom part of the glass bottle.