Thursday, August 29, 2013

How to Make Bread Clay

My guess is, bread clay has been around even before I was born. It's a clever way to put stale bread to good use, easy to make and the ingredients are all but household items; it is air-dried so you won't have to use electric energy to harden it.

A Strawberry Shortcake House fridge magnet.


Bread clay is formed by modelling, it is an additive process in sculpture by which the material is shaped and built up ( as opposed to carving which is a subtractive process; that is, parts of the material are removed to form the desired image).

With bread clay, it is best to form each part separately to be assembled or glued together later.


It is important to first stabilize the consistency of the bread clay before shaping by leaving it sealed overnight, preferably inside the refrigerator.

Upon finishing the bread clay sculpture, it is highly recommended that it be sealed with clear varnish or nail polish to avoid or at least impede the development of molds; that is, after air drying it completely (about 24 hours depending on the size) as it shrinks without the moisture thereby making the layer of nail polish crack if applied before drying.

There are lots of crafty things to come up with bread clay~ fridge magnets, charms, key chains, lockets,beads, brooches,ornaments or tiny toys, as always the possibility is endless.


Wednesday, August 28, 2013

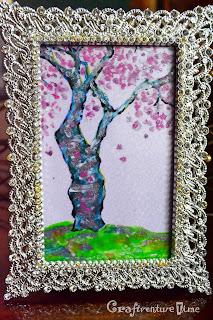
Oh Soo Tree Painting

That Winter the Wind Blows' Oh Soo Tree Painting inspired art.

The first episode of the Korean TV drama series That Winter the Wind Blows featured a beautiful but desolate painting of a leafless and dry tree. In the final episode however, the camera caught an almost the same tree painting but this time in its full sweetest bloom.

This project is a miniature version of the final ep tree using nail colors as medium for a sparkly decorative effect.


Materials needed:
  • nail colors
  • glass or acetate
  • foil or specialty paper


Procedure:

First, place the glass or transparency/acetate sheet over a sketch of the reverse image.

Since this mini-diversion uses the reverse glass painting technique~ start by rendering the foreground elements of the design, in this case~ the tree blossoms and the color highlights of the tree trunk.

Work your way towards the middle layer or the actual color of the tree trunk.

You might want to emphasize some portion of the tree's outline by using a fine-tipped black marker.

Paint a thin, transparent coat of nail polish paint for the ground.

Put a pretty specialty paper or foil underneath the finished glass or transparency/acetate sheet.  


Sunday, August 25, 2013

The Little Prince Nail Polish Painting

"It is only with the heart that one can see rightly; what is essential is invisible to the eye."~The Little Prince. 

Whoever is not enchanted with the tale of the Little Prince? Once you read the book, his melancholy yet magnificent image will just stay with you like a silent trail in the sand. This Little Prince project utilizes nail colors as the main medium. Shimmery and rich, these bottled dazzlers will lend the right mix of cuteness and brilliance as but the fitting rendition of our little man.

Materials Needed:


  • transparency/acetate sheet
  • design printout 
  • nail colors / acrylic paint
  • black-inked pen


Procedure
Trace the outlines of the design at the back of the printout to come up with the reverse image then lay the acetate over it. Transfer the design onto the transparency sheet by tracing it using a black-inked pen. Wait for the ink to completely dry out before applying color.


Let the previously applied color dry first before applying another one along side it. Other design elements can be added like stars and such, and then you can get creative with the background. 


Monday, August 19, 2013

Tin Foil Decorated Jars


Here is something for jar recyclers...

it's tin foil this time~ cut, painted and glued to the jar lid.

And I think it's quite promising.

Most of you moms are familiar with this. It's a fun material to work with. It can be smooth out with any flat object, cut and then painted with enamel afterwards. I painted mine with nail polish, they come in all fabulous colors imaginable after all. 


Friday, August 16, 2013

Cars Birthday


Some ideas to add personalized touches to your kid's Cars themed birthday party, enjoy!


Lightning McQueen Expressions Lollipops

Materials Needed:
  •  lollipops
  •  red candy wrapper
  • photosticker paper
  • black pen

Procedure:
Double-wrap the lollipops in red candy wrapper. Draw several Lightning McQueen eye expressions on photosticker paper, then cut and stick on the lollipops.

Plastic Cup Trophy


Materials Needed:
  •  a 6-liter plastic water-bottle or any container wide enough for the "cup"
  •  400 ml water-bottle for the trophy's "body"
  • any round old food container or ice cream tub with lid for the stand
  • styrofoam or sturdy board for the wings
  • gold spray paint
  • gold glitters (optional)
  • hot glue


Procedure:
Cut the upper portion of the 6-liter water-bottle and score a hole into your ice cream tub large enough for regular-sized bottle to fit in. Assemble these materials using hot glue. Make the wings using styrofoam or any sturdy board. You might need to cut or slit the sides of the "cup" to insert and fit the wings. When everything's glued securely, spray with gold paint. 


Cars Candy Cake


Materials Needed:
  •  cookie tins in various sizes or any round old food containers
  •  double-sided tape (the thin type)
  • candies and chocolates
  • cling wrap or candy wrap (optional) to protect container from the adhesive

Procedure:
Apply double-sided tape all around the side of the cookie tin. Attach the candies neatly. Cover the top with candies too and /or put another tier. Decorate.


Sunday, August 11, 2013

Plastic Bag Roses Topiary

This project aims to recycle used sando plastic bags,  it can however be substituted with tissue paper or other material.
Procedure:
1. Cut sando plastic bags into several strips; twist each strip to form a rose, secure with hot glue.
2. Put together some scrap paper from your recycle bin and form to your desired shape using clear or masking    tape onto your topiary pole.
3. Attach the roses using hot glue onto your base shape.
4. Decorate the pole with lace and bow.
Do:
...this project using only used plastic bags
Don't:
...buy any more plastic bags just for this project.


Saturday, August 10, 2013

Tin Can Votive Project

Adding ones magic touch on something common is often the challenge to any crafter. Here is a way to use a discardable object such as a tin can to create something really special.
You  need a couple of tin cans, some ordinary glasses, old nail polish,a heavy duty pair of scissors, a sturdy glue and lots of patience...and you need to protect your eyes and hands too.
Take cues from nature when thinking up your design.


Thursday, August 8, 2013

Jungle Junction Birthday Banner


Here is the Jungle Junction banner I made for my son's third birthday. 
You can download and print the letters off this page if your child loves Jungle Junction too:


Wednesday, August 7, 2013

Jungle Junction Piñatas


Here is something from my son's last birthday: pull string piñatas I  made using 6-liter water bottles as bases for Crocker and Zooter; and a shoe box base for Ms.Jolly.
Related Posts Plugin for WordPress, Blogger...