Showing posts with label nail polish craft. Show all posts

Wednesday, August 28, 2013

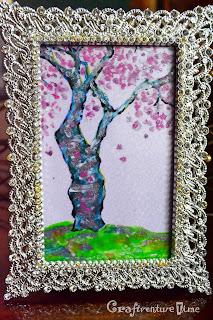
Oh Soo Tree Painting

That Winter the Wind Blows' Oh Soo Tree Painting inspired art.

The first episode of the Korean TV drama series That Winter the Wind Blows featured a beautiful but desolate painting of a leafless and dry tree. In the final episode however, the camera caught an almost the same tree painting but this time in its full sweetest bloom.

This project is a miniature version of the final ep tree using nail colors as medium for a sparkly decorative effect.


Materials needed:
  • nail colors
  • glass or acetate
  • foil or specialty paper


Procedure:

First, place the glass or transparency/acetate sheet over a sketch of the reverse image.

Since this mini-diversion uses the reverse glass painting technique~ start by rendering the foreground elements of the design, in this case~ the tree blossoms and the color highlights of the tree trunk.

Work your way towards the middle layer or the actual color of the tree trunk.

You might want to emphasize some portion of the tree's outline by using a fine-tipped black marker.

Paint a thin, transparent coat of nail polish paint for the ground.

Put a pretty specialty paper or foil underneath the finished glass or transparency/acetate sheet.  


Sunday, August 25, 2013

The Little Prince Nail Polish Painting

"It is only with the heart that one can see rightly; what is essential is invisible to the eye."~The Little Prince. 

Whoever is not enchanted with the tale of the Little Prince? Once you read the book, his melancholy yet magnificent image will just stay with you like a silent trail in the sand. This Little Prince project utilizes nail colors as the main medium. Shimmery and rich, these bottled dazzlers will lend the right mix of cuteness and brilliance as but the fitting rendition of our little man.

Materials Needed:


  • transparency/acetate sheet
  • design printout 
  • nail colors / acrylic paint
  • black-inked pen


Procedure
Trace the outlines of the design at the back of the printout to come up with the reverse image then lay the acetate over it. Transfer the design onto the transparency sheet by tracing it using a black-inked pen. Wait for the ink to completely dry out before applying color.


Let the previously applied color dry first before applying another one along side it. Other design elements can be added like stars and such, and then you can get creative with the background. 


Related Posts Plugin for WordPress, Blogger...